

Product variations are one of the cornerstones of eCommerce, and it's impossible to shop for certain products without them. Apparel comes in multiple sizes and colors, furniture comes in different wood finishes, bed linens come in different patterns; the list goes on and on. All these variants are great for giving customers more choices, but sometimes product variations can be difficult for online sellers to deal with — especially if you have a large number of them. If you don't manage your product variants properly, your online store can quickly get bogged down.
This guide will explain product variations in depth and how to set them up in your online store, including special cases where a particular variant needs different pricing, has a significantly different weight, or must be tracked separately from the rest of that product's inventory. Product variations are a crucial part of your online store, so it's important to understand them and set them up properly.
What are Product Variants?
As you explore the world of eCommerce product management, you're likely to come across different terminology: product options and product variants. Both relate to the different variations of products, and the exact terminology used can depend on the eCommerce platform you're using or article you're reading.
Sometimes, product options and product variants are used interchangeably, but more often they refer to different aspects of an eCommerce platform's tools for setting up the product variations. In this case, a product option is a specific type of variation, like Size or Color, and the product variants are the individual choices listed within those options, like Large or Red.
Some eCommerce stores use product options to refer exclusively to personalizations that can be made to a product, like custom engraving. In this case, all the non-customization choices are simply variants. Other eCommerce platforms, like Shift4Shop, simply use product options to refer to all types of variants, whether customized or not.
Naturally, this can be confusing, but the most important point to remember is that regardless of the specifics of how the terms are used, all product options work basically the same way, even the more complex options like personalization: you're simply providing a convenient way for the customer to see and select all their choices for a specific product. The difference lies in the setup process, as more complicated product options require more advanced tools to add to your store — but your eCommerce software can still make it easy.
Configuring Product Options
With Shift4Shop, you have tons of freedom for setting up product options however your products require. There's no limit to how many choices you can offer your customers, and you can have as many options per item as needed. Some product options are simpler than others, so we'll start with basic product option configuration and then go into the details about more advanced product option features.
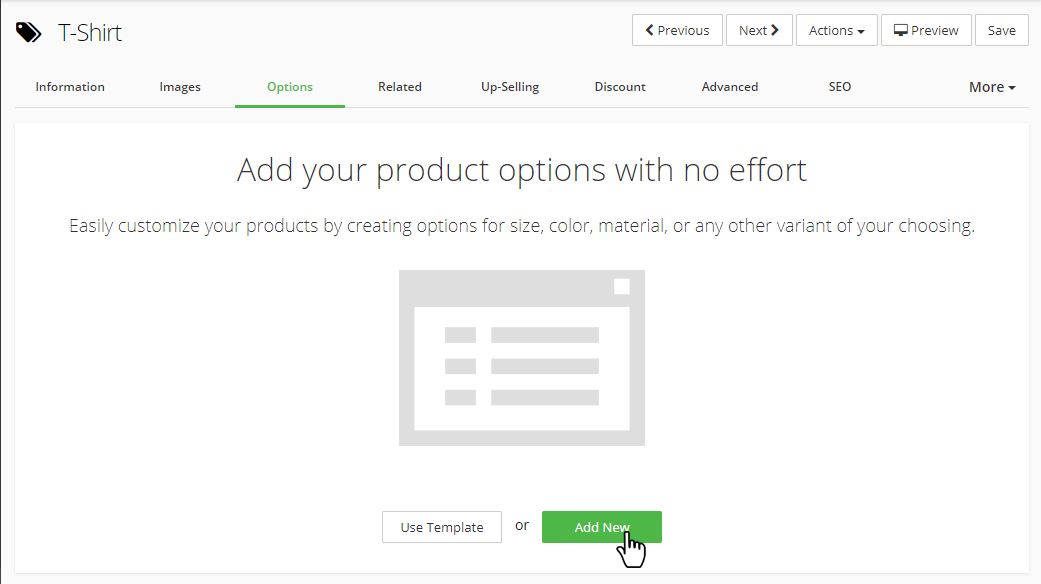
You can add product options in bulk with a CSV file as long as the base product is already present in your store, but first we'll explain the manual process for better understanding. To add options to a product, click the Options tab in the Edit Product dashboard in your Shift4Shop Online Store Manager. Near the center you'll see a green button labeled "Add New." Clicking this button will open the interface to create a new Option Set.
Option Sets, Types, and Values
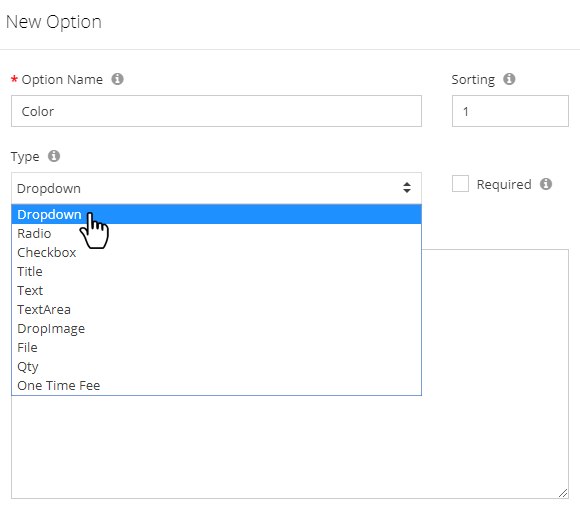
Option Sets are the basic groups of product options, like size or color. When creating or editing an Option Set, you can choose its name, sorting order (where it appears in relation to other Option Sets on the product page), and whether or not it's required for a customer to choose one of the options in the set before proceeding with their purchase. Required product options will automatically have an asterisk by their names to signal to the customer that they need to choose to continue. You can add multiple Option Sets per product and arrange them in your preferred order.
You'll also need to choose an Option Type, which determines more about how the option works, including the way a customer will select an option from the list. Some Option Types allow only one selection to be made, while others allow multiple selections. Other Option Types are best used for specific scenarios, such as text areas for personalizing products. The Option Type you use for each Option Set should depend on the nature of the product option. You can choose the following:
- Dropdown menu (single-option selection)
- Radio buttons (single-option selection)
- Checkboxes (multiple options can be selected)
- Title (not an actual option for the customer; simply displays a line of text you can use to separate Option Sets from one another)
- Text (single line of text specified by the customer; you can set a character limit)
- Text Area (for a block of text specified by the customer; you can set a character limit)
- DropImage (dropdown menu that displays thumbnail images)
- File (lets the customer upload a file with their order)
- Quantity (adds a quantity field)
- One Time Fee (a one-time fee added to the order, such as a setup charge, that won't be needed on the customer's later orders of the same product)
 Some of these Option Types are simpler in nature, and are best for straightforward product choices like t-shirt size. Others are useful for different purposes that allow you to provide your customers with the types of options they'll need for products with specific circumstances. For example, the Text Area can be used to let customers specify a personal message to be included within a card that accompanies the product (and we cover more options for personalization later in this article).
You can also add a Help section that appears as a question mark icon next to the Option Set's name on the product page. Customers can click this question mark icon to learn more about the type of option they're choosing. You have 2 choices as to how to do this: you can use the Additional Information field to create a small popup, or you can use the URL field to open a new browser tab to a specific page instead. The method you use should depend on how much information you need to give to the customer. If it's only a small amount of text, the Additional Information field would be fine, but more complex references like sizing charts are usually best on their own page, in which case you'd use the URL field.
Below these fields in the Option Set creation interface, you can add the actual Option Values, which are the specific options themselves, such as individual sizes or colors. You can always add, delete, or hide individual Option Values after you've created the Option Set.
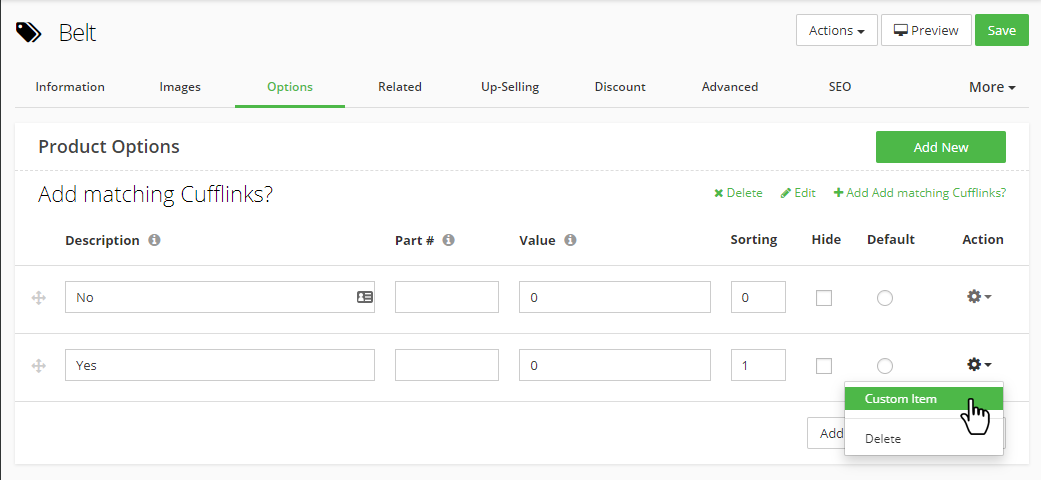
Once you've created and saved your Option Set, it will be visible in the Options tab of the product in your Shift4Shop Online Store Manager. From there, you can further refine your Option Values in a few ways:
- Description: this field lets you change the Option Value's name.
- Part #: this field is for the specific Part Number of the product option, if you need to assign one.
- Value: this field lets you add a price adjustment to the product option. This comes in handy if some of your product options are more expensive than the rest.
- Sorting: this field lets you determine the order in which the product options appear within that particular Option Set.
- Hide: this checkbox allows you to hide a product option from customer view without deleting it from your store.
- Default: lets you optionally choose one product option per Option Set to automatically be selected as the default option when the customer views the product page.
Additionally, when creating your options, you can configure the selection as a “Custom Item” by using its respective action wheel as shown below. This is used to create a Product Bundle by adding an additional item to the order when the customer selects this option.
Understanding Advanced Options
Sometimes, simply adjusting a product option's price with the Value field isn't enough. A particular product option might be significantly different in ways that an increased price can't reflect. For example, the item itself may cost the same, but be more expensive to ship. Or, you may need to track it separately in your inventory. For these types of situations, you need Advanced Options.
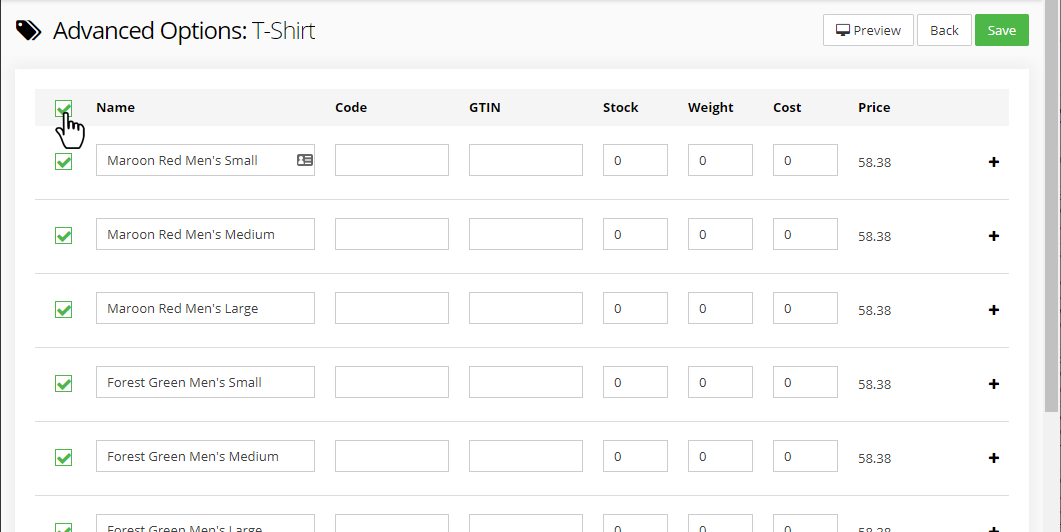
Shift4Shop's Advanced Options give you additional control over product options without splitting them off into a separate product. You can enable Advanced Options for a product by viewing its normal options and clicking on the “Actions” menu at the top right to select “Advanced Options” from the list. Once activated, Advanced Options will create listings for every product option combination for that product. (Remember, this doesn't split the options into multiple products, but instead gives you more precise control over each product option.)
Each Advanced Option includes extra data fields you can configure as needed:
- Code: this replaces the normal SKU or Part Number used for the base item, allowing you to treat the product option as a separate product while still displaying it to customers as an option of the base item.
- GTIN: a GTIN is the Global Trade Item Number (or UPC), and in this field you can assign the product option's unique GTIN as needed for certain product search feeds.
- Stock: this field is for tracking the inventory you have in stock of this specific product option, rather than tracking all product options together under one inventory stock count.
- Weight: here, you can provide any additional weight beyond that of the base item, with the number in this field being added to the base product's weight.
- Cost: if this product option has a different cost to you as a seller, you can enter it here to completely override the amount in the Cost field in the base product's Information tab.
- Dimensions: if this product option has a different length, width, or height than the base product, you can enter those dimensions here.
- Custom Points: if you're using Shift4Shop's Reward Points module to run a loyalty program for your store, you can assign a custom number of Reward Points to be awarded for purchase of this particular product option, to override the normal reward amount.
You don't need to use all these fields while editing Advanced Options for a product, only the fields that differ from the base product's information. If the product has multiple Option Sets, remember that an Advanced Option will be created for each combination of options in order to allow you the most granular control possible.
Pricing Models for Product Options
If a product has different pricing for some or all of its options, there are a few ways you can handle this. The best way would depend on how different the pricing is between the various options, but it's ultimately up to you as to which pricing model is best for any of your products. You can use different pricing models on each product as needed.
Product Base Price + Fee on Options
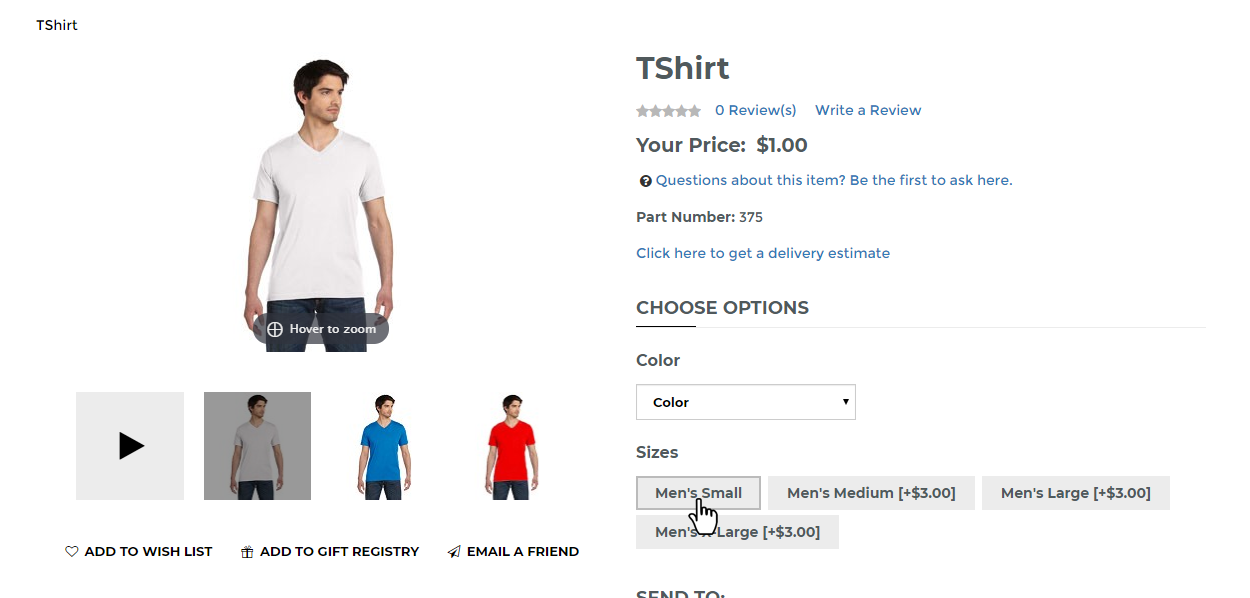
This involves setting your product's base price and using the Value field for each Option Value to add to the base price. For example, larger clothing sizes are often a little more expensive, so you could charge more for your XXL t-shirts by entering a value that will be added to the base price. Adding 2.75 to the XXL size option in the t-shirt product's Options tab will increase the price by $2.75. Customers will see the addition to the price when selecting their options.
Product as $0 + Full Price on Options
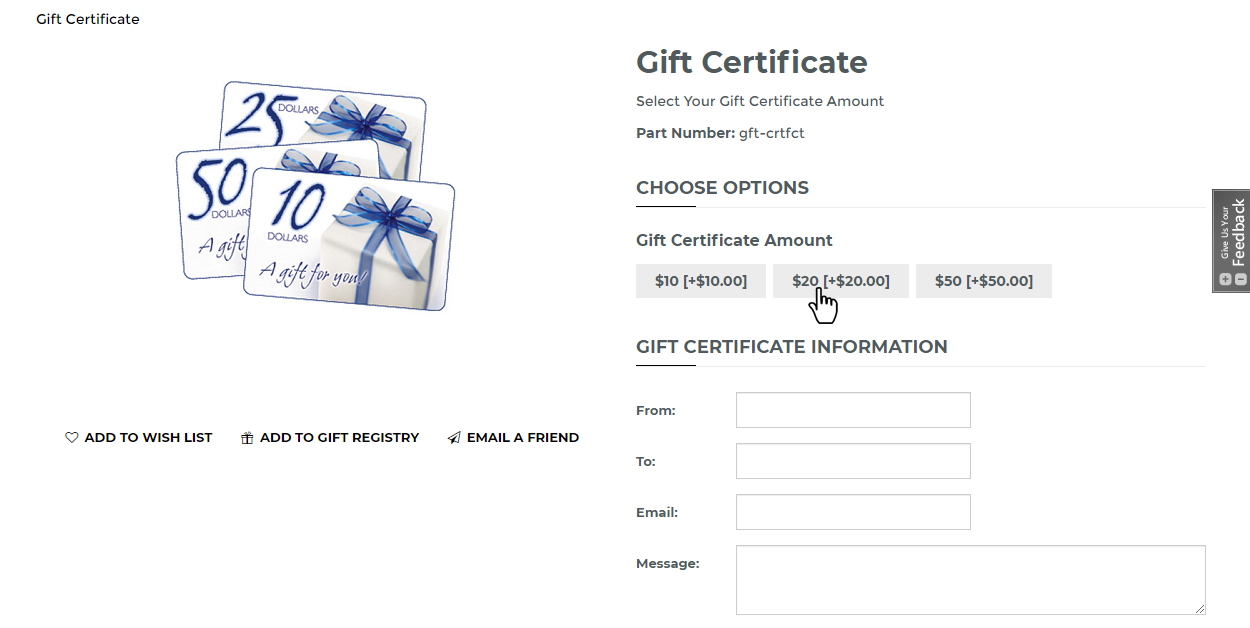
If a product's options have vastly different pricing to the point that a good "base price" is impossible to determine, you can set the product's pricing itself at $0 and price all the product options individually within their Value fields. The values you enter will be added to the base price of $0, resulting in the full price of each product option. These prices will be visible to the customer as they view the options. To help your customers understand this pricing model, you can change the base price to display text such as "Pricing starts at $x" by editing the Price and Quantity Options in the product's Advanced tab.
Advanced Options Price Configuration
Shift4Shop makes it possible to create different Pricing Levels to offer different pricing to different Customer Groups, but you may need finer control over the pricing of specific Advanced Options for different Pricing Levels. Normally, if you edit a product option's price by entering the difference in that option's Value field, that same price increase will appear for all Pricing Levels on your store — e.g. the example XXL t-shirt would cost +$2.75 no matter which Pricing Level the customer belongs to. However, you can change this with Shift4Shop's Advanced Options Price Configuration app. Once you purchase and install the app and enable Advanced Options on a product, you'll then be able to specify the exact price increase or decrease for each product option across every Pricing Level.
How to Set Up Product Options across Multiple Products
Since it's best for a business to be able to set up its online store exactly as it needs, it's great to have so much power over your product options — but greater customization usually comes with longer setup times. That's why Shift4Shop provides a few different ways to set up product options across a wider range of your inventory at once, so you don't have to configure each product manually.
Category-Wide Options
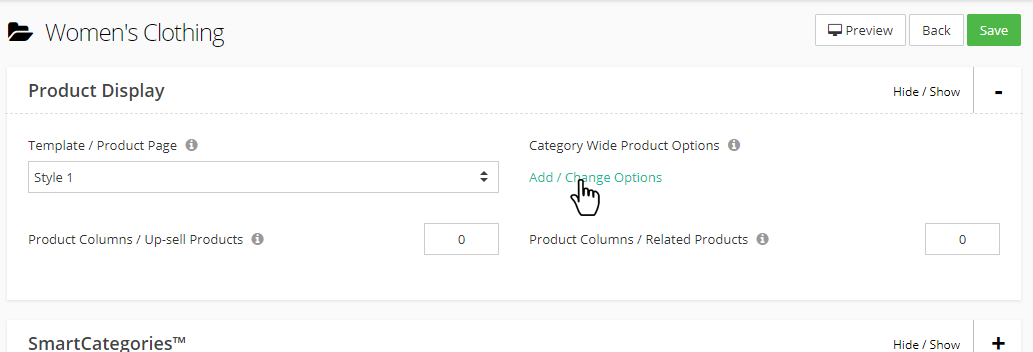
If all the products in a category are going to need the same options, you can save loads of time by creating those options directly in the category. The process for creating the product options is the same except for accessing the option creation interface from the Category Details rather than from an individual product.
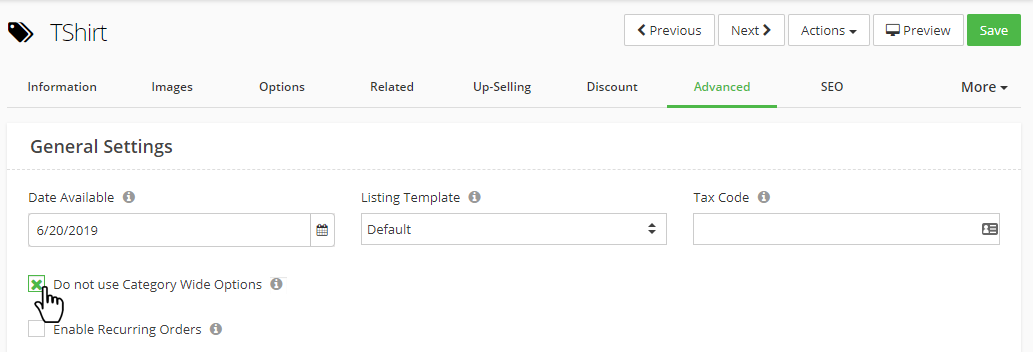
If you create category-wide options and then later decide you want to handle a product's options individually, you can just check the "Do Not Use Category Wide Options" box in the product's Advanced tab.
Product Options Templates
In some cases, you may want to apply the same product options to a wide range of products without relying on their categorization to do so. You may also want to preconfigure a set of product options that can be applied directly to a product at any time. You can do so with Product Options Templates.
To set up a Product Options Template, go to your Product List and click the "More" button near the upper right corner. Select Options Templates and follow the same procedure as normal, setting up the product options as you desire. Once it's complete, to apply the template, visit the product's Options tab in your Shift4Shop Online Store Manager and click "Use Template." You'll then be given a choice of which of your templates to use and how to apply it. You have 2 ways to apply the template to your products, which will affect the way information is shared between the product and the template.
- Copy Options: this selection simply copies the product options information from the template and pastes it into the product. If you change the template later, the changes will not transfer to the product unless you copy it again.
- Link to Template: this selection adds the template's product option information to the product, but maintains a connection between the product and the template. If you change the template, the changes can be applied to the linked product.
The choice you make should depend on how you need to use the product templates for your product management workflow. If you want to apply options to products as a starting point for later editing on a per-product basis, Copy Options is better. If you want to manage product options simultaneously across multiple products and update them all at once in a single location, Link to Template is better. As long as you understand the difference between the two methods, you'll be able to use Option Templates exactly as needed for your store.
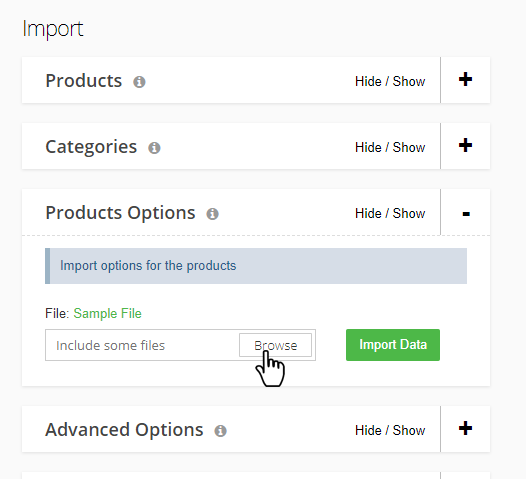
Adding Product Options via CSV Import
In some cases, it may be more convenient for you to add your product options in bulk with a CSV file upload to your store. Your products must be added first, whether manually or via another CSV, before you can upload the product options. This is necessary because the product options in the CSV rely on existing data to connect them to the right product. You can also upload Advanced Options via CSV, with the same requirements.
Enhancing Product Option Display with Product Options Matrix
Product Options Matrix is a Shift4Shop app that displays product options in a convenient format using data from the Advanced Options module. Because of its table-style layout, Product Options Matrix can only work for products with up to 2 Option Sets, but for products meeting the right criteria, this is very powerful and extremely convenient for your customers.
As an example of how Product Options Matrix works, we'll use t-shirts with both size and color options available. A customer must choose both a size and a color before placing their order, and some specific combinations of color and size may be sold out. Product Options Matrix produces a table in which the customer can see all available size and color combinations and type in quantities to quickly build their order. If any combinations are sold out, they'll be clearly marked in the table. The "Sold Out" data comes from using Advanced Options to track each product option's inventory individually.
Once you purchase and install the Product Options Matrix app, you don't need to do anything to get it to appear on products that meet the criteria of using Advanced Options and having a maximum of 2 Option Sets. The table will automatically show when applicable.
Limiting Selectable Options with Product Option Rules
Sometimes, for products with multiple options, you may want to limit subsequent choices for the customer based on the previous options they've already selected. Option Rules is a Shift4Shop app that lets you set up parent-child relationships for your product options so that a customer's initial option choice determines the types of options available within that selection.
Once you've purchased and installed the Option Rules app, you can control the additional options that appear once a customer has chosen a previous option. Option Rules can be set for the dropdown menu, radio button, and DropImage Option Types — i.e. the ones that let customers choose only a single option from the Option Set. However, the product options that appear once the customer makes their choice can be any Option Type unless they also need their own Option Rule to control additional options — "parent" options must be the dropdown, radio button, or DropImage type even if they're the "child" of another option, but options that are not the "parent" of any other options may be of any Option Type. For example, you can cause a text box option to appear based on a previous radio button selection, but that text box cannot control another product option.
Using Product Options for Personalization
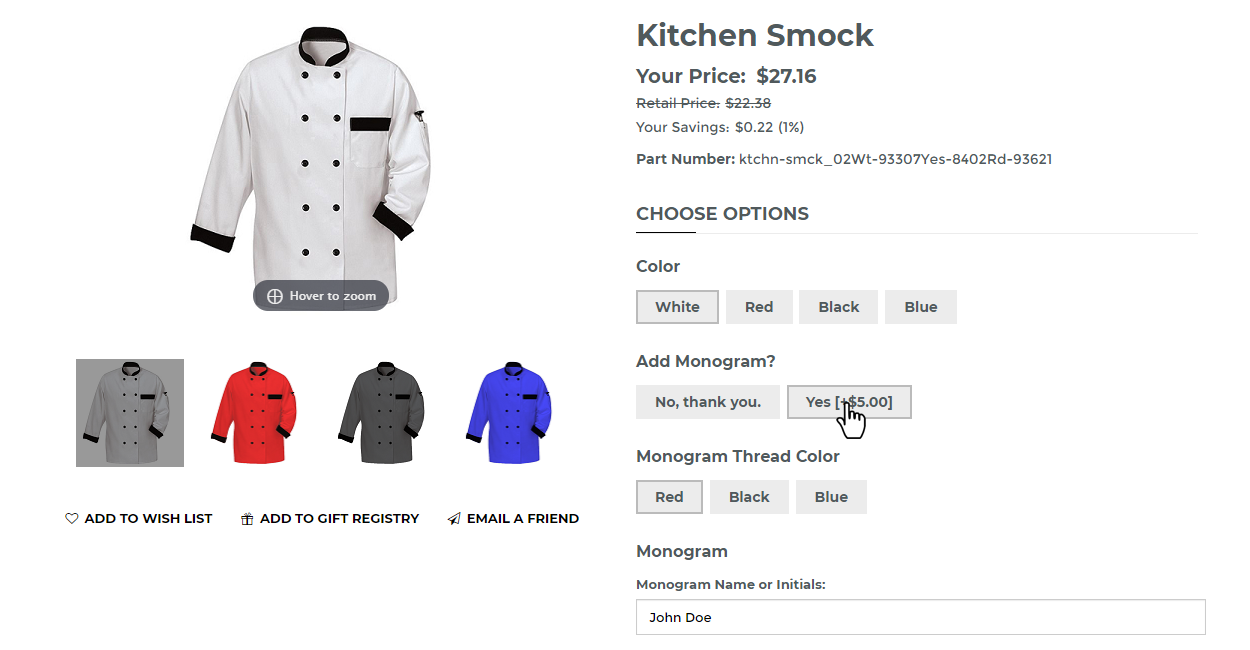
Personalized products are quite popular, whether it's a monogrammed polo shirt, an engraved watch, a custom business card, or any other product that a customer can embellish with their own name or design. You can easily use Shift4Shop's product options for personalized products by using certain Option Types. Text, Text Area, and File are Option Types that are perfect for personalization.
When you add an option using the Text or Text Area type, it allows customers to enter their own text that will appear within their order. You can use these Option Types for monograms, names, or other text to add to the product before shipping. Make sure you set character limits for text so customers don't enter messages that are too long to use.
Similarly, the File Option Type is perfect for letting customers upload custom graphics for you to apply to the product. If you need specific file types, like PNG images at a certain resolution, you can add this information to the Help icon for this option using the URL or Additional Information fields. You can also add a short summary using the Title Option Type to display a short piece of text right above the option on the product page.
Personalization with Shift4Shop can be very rich. Remember, you can have multiple Option Sets per product, so if, for example, you sell custom embroidered baseball caps, your product page could include options like these:
- Color (using the DropImage Option Type to display a thumbnail image of each available color)
- Size (using radio buttons or a dropdown menu)
- New or Weathered (using radio buttons or a dropdown to let customers choose whether they want a cap that looks brand new, or one with a weathered or vintage appearance)
- Your Custom Text (using the Text Option Type with an appropriate character limit to let customers enter a name or slogan)
- Your Image (using the File Option Type to let customers upload the image or logo they want embroidered onto the cap)
 This is just an example of the depth of personalization you can offer with Shift4Shop's product options. Other ideas could include Embroidery Color (letting customers choose the color of thread used via another DropImage option) and Location (letting customers decide whether they want embroidery on the front or back of the cap or both, using the Checkbox Option Type).
If you want to sell plain baseball caps alongside the personalized ones, you could use Shift4Shop's Option Rules app to hide the personalization fields altogether unless the customer selects a "custom embroidery" option with a surcharge that you set in that option's Value field.
Best Practices for Displaying Your Product Variations
The ease of the customer's shopping experience is vital to your success, so you can increase sales by ensuring your product options are displayed in a way that's easy to understand and convenient to navigate. If the customer gets confused at any time, they're likely to feel reluctant to spend their money, so following these best practices for product options will be a great benefit.
Make Sure the Customer Can Preview All the Options
Colors don't necessarily mean the same thing to everyone. If your product comes in brown, green, and blue, you can be sure that some people are going to picture those colors differently than others. It's just not smart to go by the names of colors alone. One person's blue may be another person's cerulean, and don't even get started with how green some blues can be (or vice versa).
You can solve this problem by displaying your product's color options via Shift4Shop's DropImage functionality. DropImage creates a dropdown menu populated with images instead of text, so instead of color names, you can show thumbnail images or color swatches. The customer selects one from the DropImage dropdown just as they would from a regular dropdown menu. For best results if you plan to use color swatches, use an actual photo of the product's color, maybe cropped from a larger photo. Don't use colors from a color picker on your computer unless you can be really sure the RGB color you've chosen truly represents the color of the actual product.
Thumbnails or swatches are a big help, but you can still improve the visibility of your product options by ensuring that your product's photo gallery contains at least one photo of every available option. These can be lifestyle photos or plain product photos, or even a photo with several variants of the product shown together. If you do combine multiple product variants into a single photo, make sure it's clear as to which is which.
Use Clear, Precise Labels
Even when color options are backed up with a thumbnail image, you can still make them easier to understand by naming them more precisely. Maybe your brown really is a little more of a tan, or maybe it's closer to coffee or chocolate. Maybe your green is more of a forest green, or possibly even an olive or sage. Maybe your blue is navy, cobalt, cyan, or even teal!
If you can be more specific with your color names, do so: it will help you and your customers in a few ways. Your products will stand out more and customers will find it easier to visualize them. Plus, if you get access to new inventory with new colors that still fall within the same spectrum (like several shades of brown), the more precise naming means you won't have a dozen brown rug designs with only one of them arbitrarily named "brown." That could confuse both you and your customers, and actually makes the plainly-named option look cheap in comparison to the others.
Colors aren't the only type of product option that benefits from more precise labeling. "Small, medium, and large" can describe size too vaguely for many product types, so consider using measurements instead. You can even use both — just name your medium-sized rug "Medium 40in x 30in."
Informative labels for your options also help make your site more accessible to people with disabilities or who otherwise rely on text-to-speech screen reading software to help them shop. Accessibility is crucial to your business, so it's always a worthwhile effort.
Great Websites using Product Options
Now that we've explained product options in detail, it's time for some examples of online stores using Shift4Shop's product option functionality to great effect. Each of these stores illustrates some of the concepts we've covered above.
Webobble
Webobble sells custom bobblehead figurines based off of customer photos. In addition to basing the bobblehead directly on the person in the photo the customer provides, Webobble also gives customers tons of options for body type, hair and eye color, height, material, and even more customization like adding accessories to the figure and text to the base. Webobble customers can essentially completely design their own custom figurine using a rich selection of product options and photo upload. This is a fantastic example of how to sell a completely customizable product using the different Option Types included in Shift4Shop.
Direct Door Hardware
Direct Door Hardware sells a huge variety of doorknobs, hinges, handles, deadbolts, and nearly every type of door hardware and accessory you can think of. Their website makes extensive use of dropdown menus both with and without images. Most of their products have so many options available that it becomes essential to display them in an organized manner — which their store design manages perfectly. Shift4Shop's Color Swatches app also enables custom programming that changes the main product image based on the option selected by the customer.
Stardust Memorials
Stardust Memorials sells customized cremation urns and other memorial gifts for remembrance of loved ones. One thing that makes Stardust Memorials stand out among other eCommerce businesses is that their customers are practically guaranteed to be going through a tragic period in their lives. The grieving process is difficult enough, so Stardust Memorials makes their website as easy to use as possible. Customers can decide how much customization they want for the urn, including engraved medallions, keepsake accessories, and more. The numerous positive testimonials show that Stardust Memorials is succeeding in their goal of guiding customers through what can be a very painful buying process.
Shopify Limitations with Product Variations
Before we wrap up this article, we want to address a question you may be asking: now that you know about the product options in Shift4Shop, how do they measure up with Shopify? After all, Shopify is an extremely popular SaaS eCommerce platform, and it's smart for a business owner to compare all their options.
The answer is that Shift4Shop's built-in product option functionality comes out far ahead of Shopify's. Shopify allows fewer product options out of the box, and in order to get most of the features included in Shift4Shop, you'll need to install 2 apps — each with its own monthly cost. Here are the details.
Shopify limits the number of options per product. As we mentioned near the beginning of this article, Shopify uses the term product option to refer to a specific type of option on a product, which Shift4Shop calls Option Sets. A product variant on Shopify is the specific option within that type, which Shift4Shop calls an Option Value. (However, Shopify also uses different names for these within their Variants setup interface.)
Shopify only allows a maximum of 3 product options, such as Size, Color, and Style, with up to 100 variants each (e.g. the individual sizes, colors, and styles). This means you're out of luck if your products have more than 3 types of options, such as Size, Color, Style, and Material. Your only recourse here is to customize your theme code (which Shopify says you only "might" be able to do) or expand your product option functionality with a paid app.
In order to get unlimited options and variants, and access several Option Types that aren't in Shopify at all, you'll need to subscribe to Bold Product Options, a third-party Shopify app that enables unlimited options, file uploads, radio buttons, and tons of other features. The cost for this app starts at $9.99 per month. Most of these features you get in Shift4Shop automatically, without having to pay extra.
Another choice for Shopify is the third-party Advanced Product Options app, which contains much of the functionality of Bold Product Options but also includes similar Advanced Options features as found in Shift4Shop, like individual inventory tracking for specific product variants. This app costs $19.99 per month, but remember that to use Advanced Options in Shift4Shop, you just need to activate them in your dashboard for the products you want the functionality for.
When it comes to product options on Shopify, you'll be paying more for less functionality than if you chose to build your online store with Shift4Shop. Shopify's lowest-priced plan (that includes a website) is Basic Shopify at $29 per month, plus the cost of one or both of the above apps. Compare that to Shift4Shop, with a free, unlimited plan that includes rich product option customization right out of the box, and the smarter choice is obvious.
Conclusion
Options, variants, customization, personalization… these are all important considerations to make when you're setting up your product pages on your online store, and the process can definitely be overwhelming to a beginner. We hope that this article has helped shine a light on the more complex parts of setting up product options, and that you've gained a greater understanding of how to build your online store's product pages to best effect. Remember that the experience you provide your customers is a huge influence on your conversions, so make sure you put your product options to work!


Leave a reply or comment below